Introduction
The Encrypting File System (EFS) included with the
Microsoft® Windows® 2000 operating system is based
on public-key encryption and takes advantage of the
CryptoAPI architecture in Windows 2000. Each file
is encrypted using a randomly generated file encryption
key, which is independent of a user’s public/private key
pair; thereby stifling many forms of
cryptoanalysis-based attack.
File encryption can use any symmetric encryption
algorithm. The release of EFS uses the Data Encryption
Standard X, or DESX (128 bit in North America and 40 bit
International) as the encryption algorithm. Future
releases will allow alternate encryption schemes.
EFS supports encryption and decryption of files
stored on local drives as well as those stored on remote
file servers.
Note: In the case of remote servers, you
can encrypt files and folders on the server but your
data is not protected if you access a file over the
network. Windows 2000 provides network protocols
such as Secure Sockets Layer/Private Communication
Technology (SSL/PCT) to encrypt data access over the
network.
User Interaction
The default configuration of EFS allows users to
start encrypting files with no administrative effort.
EFS automatically generates a public-key pair and file
encryption certificate for file encryption for a user
the first time a user encrypts a file.
File encryption and decryption is supported per file
or for an entire folder. Folder encryption is
transparently enforced. All files (and folders) created
in a folder marked for encryption are automatically
encrypted. Each file has a unique file encryption key,
making it safe to rename. If you rename a file from an
encrypted folder to an unencrypted folder on the same
volume, the file remains encrypted. However, if you copy
an unencrypted file into an encrypted folder, the file
remains in the state that it was in—in this case the
file remains unencrypted. Command-line tools and
administrative interfaces are provided for advanced
users and recovery agents.
You don’t have to decrypt a file to open it and use
it. EFS automatically detects an encrypted file and
locates a user’s file encryption key from the system’s
key store. Since the key storage mechanism is based on
CryptoAPI, in the future, users will have the
flexibility of storing keys on secure devices, such as
smart cards.
The initial release of EFS does not support file
sharing. However, the EFS architecture is designed to
allow file sharing between any number of people by the
simple use of their file encryption certificates. Users
can then independently decrypt files using their own
private keys. Users can be added easily (if they have a
configured public key pair) or removed from a group of
permitted sharers.
Data Recovery
EFS provides built-in data recovery support. The
Windows 2000 security infrastructure enforces the
configuration of data recovery keys. You can use file
encryption only if the system is configured with one or
more recovery keys. EFS allows recovery agents to
configure public keys that are used to recover encrypted
data if a user leaves the company. Only the file
encryption key is available using the recovery key, not
a user’s private key. This ensures that no other private
information is revealed to the recovery agent.
Data recovery is intended for business environments
where the organization expects to be able to recover
data encrypted by an employee after an employee leaves
or if file encryption keys are lost.
The recovery policy can be defined at the domain
controller of a Windows 2000 domain. This policy is
enforced on all computers in that domain. The recovery
policy is under the control of domain administrators who
can delegate this to designated data security
administrator accounts using Windows 2000 directory
service delegation features. This provides strong
control and allows flexibility regarding who is
authorized to recover encrypted data. EFS supports
multiple recovery agents by allowing multiple data
recovery certificates configurations. These features
provide organizations with redundancy and flexibility in
implementing their recovery procedures.
In the default Windows 2000 installation, when
the first domain controller is set up, the domain
administrator is the specified recovery agent for the
domain. The way the domain administrator configures the
recovery policy determines how EFS is implemented for
users on their local computers. The domain administrator
logs on to the first domain controller to change the
recovery policy for the domain. Table 1 helps you see
the effect on users of several recovery policy
configurations.
| Effect on EFS
locally |
EFS is available
locally |
EFS is available
locally |
EFS cannot be
used |
| Configuration |
Recovery policy in
place configured with designated recovery
agent(s) |
No recovery policy at
the domain level |
Empty recovery
policy |
| Action by domain
administrator |
None required |
Delete recovery
policy on first domain controller |
Delete every recovery
agent |
Table 1: Effect of Recovery Policy Configurations
on Users
EFS can also be used in a home environment. EFS
automatically generates recovery keys and self-signed
certificates when the local administrator logs on,
making the local administrator the default recovery
agent. Home users can also use the command line tool to
recover data using the administrator’s account. This
reduces the administrative overhead for a home user.
The remainder of this paper provides sample
procedures that demonstrate the end-user and
administrative capabilities of Windows 2000 EFS.
These are intended for use when evaluating EFS for your
network. Please walk through these examples
sequentially.
Requirements and Prerequisites
To complete this walkthrough, you need the
following:
- A client computer running Windows 2000
Professional operating system.
- A server computer running Windows 2000 Server
operating system.
- A Windows 2000 Server domain controller.
- A local area network to connect these three
computers.
- All three computers should be members of the same
domain.
The common infrastructure assumed in this guide is
covered in the Step-by-Step Guide to a Common
Infrastructure Part
I: Installing a Windows 2000 Server as a Domain
Controller, and Part
II: Installing a Windows 2000 Professional Workstation
and Connecting it to a Domain. If you are not using
the common infrastructure, you need to make the
appropriate changes to this instruction set. The
computer names you will see throughout this document are
based upon the common infrastructure.
User Scenarios
Encrypting a Folder or File
When encrypting a folder or file, you can use Windows
Explorer or you can use the command-line utility,
Cipher.exe. Both procedures are described next. This
guide assumes you are performing the User Scenario
exercises on a computer running Windows 2000
Professional.
To use Windows Explorer to encrypt a folder or
file
- Click Start, point to Programs,
point to Accessories, and click Windows
Explorer.
- Right-click the folder or file name you wish to
work with (in this example a folder we created under
My Documents called Encrypted Files),
and choose Properties.
- On the General tab in the Encrypted
Files Properties dialog box, click
Advanced.
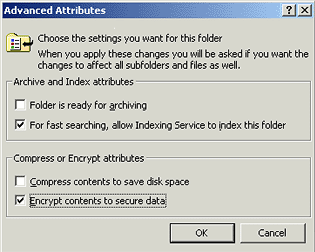
Figure 1. Advanced
attributes
- On the Advanced Attributes dialog box,
select Encrypt contents to secure data and
click OK. This returns you to the Encrypted
Files Properties dialog box.
- Click OK in the Encrypted Files
Properties dialog box.
- You are asked to choose between encrypting the
folder and all its contents or just the folder itself.
If the folder is empty, choose to encrypt the folder
only; otherwise, choose the folder and its contents,
and click OK.
- A dialog box shows you the status of encrypting
the folder or file. Click OK again to make this
change, and close the snap-in.
Decrypting a Folder or File
As with encryption, you can use Windows Explorer or a
command-line utility to decrypt a folder or file. Both
procedures are described next. Note that you do not need
to decrypt a file to open the file and edit it. Decrypt
a file that you want to make accessible to others.
To use Windows Explore to decrypt a folder or
file
- Click Start, point to Programs,
point to Accessories, and select Windows
Explorer.
- Right-click the folder or file name, and choose
Properties.
- On the General tab of the Properties
dialog box, click Advanced.
- On the Advanced Attributes dialog box,
clear the Encrypt contents to secure data check
box, and click OK.
- Click OK in the Encrypted Files
Properties dialog box.
- You are asked to choose between decrypting the
folder and all its contents or just the folder itself.
The default is to decrypt the folder only, and then
click OK.
Note: It is recommended that you encrypt
folders and not individual files. This is because many
existing applications are not aware of encryption and
can therefore render the file in clear text.
To use Cipher.exe to encrypt a folder or
file
- To encrypt the folder, D:\Encrypted Files
(substitute this with the drive letter and folder
that you are working with), click Start, click
Run, type cmd and click OK. For
example, at the command prompt,
type:
D:\>cipher /e /s:"D:\Encrypted
                          Files"
- Press ENTER.
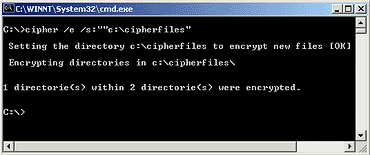
Figure 2. Cipher
command
The folder’s attributes report that this folder is
encrypted.
To use Cipher.exe to decrypt a folder or
file
- To decrypt the folder, D:\Encrypted Files,
type
C:\>cipher /d /s:"C:\Encrypted
                          Files"
- Press Enter.
Using an Encrypted File or Folder
If you are the user who encrypted a file, you can use
that file as before. You can open, edit, copy, and
rename the file. If you are not the user who
encrypted the file, you cannot do any of those things
and you receive an Access Denied error message if
you attempt to access the file. Only the user who
encrypted the file can decrypt it—making it available
again to others in its unencrypted (plain text)
form.
With an encrypted folder, if you had access to that
folder before it was encrypted, you can still open it.
Folders are only marked as encrypted so that all files
in them are encrypted as they are created, and
sub-folders are marked encrypted at creation.
Note: An encrypted folder can be decrypted
only by the user who encrypted it.
Copying an Encrypted Folder or File
The following explains the procedures and limitations
for copying encrypted folders or files on the same
volume and from one volume to another.
- To copy a file or folder on the same computer
from one NTFS partition in a Windows 2000
location to another NTFS partition in a
Windows 2000 location. Copy the file or
folder as you would an unencrypted file. Use Windows
Explorer or the command prompt. The copy is encrypted.
- To copy a file or folder on the same computer
from an NTFS partition in a Windows 2000 volume
to a FAT partition. Copy the file or folder as you
would an unencrypted file. Use Windows Explorer or the
command prompt. Because the destination file system
does not support encryption, the copy is in clear
text.
- To copy a file or folder to a different
computer where both use the NTFS partitions in
Windows 2000. Copy the file or folder as you
would an unencrypted file. Use Windows Explorer or the
command prompt. If the remote computer allows you to
encrypt files, the copy is encrypted; otherwise it is
in clear text. Note that the remote computer must be
trusted for delegation; in a domain environment,
remote encryption is not enabled by default.
- To copy a file or folder to a different
computer from an NTFS partition in a Windows 2000
location to a FAT or NTFS in a Windows NT® 4.0
location. Copy the file or folder as you would an
unencrypted file. Use Windows Explorer or the command
prompt. Because the destination file system does not
support encryption, the copy is in clear text.
Note: If your original file was encrypted,
Microsoft recommends that you use the File Properties,
Advanced option to confirm the status of the destination
file.
Moving or Renaming an Encrypted Folder or
File
The following explains the procedures and limitations
for moving encrypted folders or files on the same volume
and from one volume to another.
- To move or rename a file or folder within the
same volume. Move the file as you would an
unencrypted file. Use Windows Explorer, the context
menu, or the command prompt. The destination file or
folder remains encrypted.
- To move a file or folder between volumes.
This is essentially a copy operation. Review the
previous section, Copying an Encrypted Folder or
File.
Deleting an Encrypted Folder or File
If you have access to delete the file or folder, you
can delete it as you could an unencrypted file.
Note: Deleting an encrypted folder or file
is not restricted to the user who originally encrypted
the file.
Backing Up an Encrypted Folder or File
The following explains the procedures and limitations
for backing up encrypted folders or files.
Backing up by copying. Backup created using
the Copy command or menu selection can end up in
clear text, as explained previously in the section, Copying
an Encrypted Folder or File. Backing up using
Backup in Windows 2000 or any backup utility that
supports Windows 2000 features. This is the
recommended way to back up encrypted files. The backup
operation maintains the file encryption, and the backup
operator does not need access to private keys to do the
backup; they only need access to the file or folder to
complete the task.
To use Backup to back up a file, folder, or
drive
- Click Start, point to Programs,
point to Accessories, point to System
Tools, and then click Backup. The Backup
wizard appears.
- Click the Backup tab.
- Select the drive, files, or folders that you want
to back up. (in this case My Documents\Encrypted
Files).
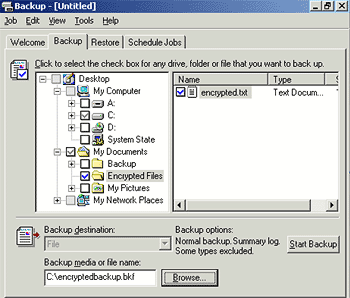
Figure 3. Backup file
selection
- Select the destination in the Backup media or file
name list. Click Browse to locate a
pre-existing backup file.
- Click Start Backup.
- In the Backup Job Information dialog box,
make selections, and then click Start Backup.
When the backup process is complete, click
Close in the Backup Progress dialog box.
Backup backs up the entire encrypted file, folder, or
drive to the backup file you selected. This file can be
copied to FAT media, such as floppy disks, and is secure
because its contents remain encrypted.
Restoring an Encrypted File or Folder
Restore operations parallel those used for backing up
encrypted files. The following explains the procedures
and limitations for restoring backed up encrypted files
to the computer where the backup was performed and to a
computer other than the one where the files were backed
up.
Restoring by Copying. Restored files created
using the Copy command or menu selection can end
up in clear text, as explained previously in the
section, Copying
an Encrypted Folder or File. Restoring using
Backup in Windows 2000 or any backup utility that
supports Windows 2000 features. This is the
recommended way to restore encrypted files. The restore
operation maintains the file encryption, and the
restoring agent doesn't need access to private keys to
restore the files. After the restoration is complete,
the user with the private key can use the file
normally.
To use Backup to restore a file on the same
computer
- Click Start, point to Programs,
point to Accessories, point to System
Tools, and then click Backup.
- Click the Restore tab.
- Right-click File, and then click Catalog
file.
- Enter the path to the backup file (for example,
C:\Encryptedbackup.bkf).
- Check the encrypted folder that needs to be
restored. All its contents are restored automatically.
In the Restore files to list, select
Alternate location.
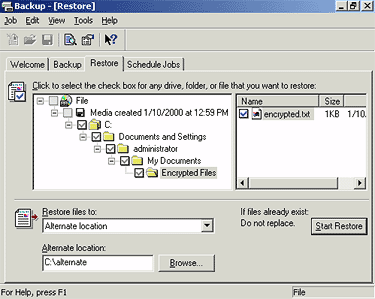
Figure 4. Restore window
- In the Alternate location box, provide the
name of the folder where you want the encrypted
material to be restored.
- Click Start Restore.
- Click OK to confirm the restore process.
- Click OK to confirm the backup file. When
the restore process is complete, click Close.
The Restore Progress dialog shows you the
progress of the operation. You can use the
Properties of the folder to check that indeed it
was restored encrypted.
- Close the Backup window.
Restoring Files to a Different Computer
If you want to be able to use encrypted files on a
computer other than the one the files were encrypted on,
you need to ensure that your encryption certificate and
associated private key are available on the other
system. You can do this either by using a Roaming
Profile or by manually moving your keys.
- Using a Roaming Profile. Request that your
administrator set up a roaming profile for you if you
don’t already have one. Once you have a roaming
profile, the encryption keys you use are the same on
all computers that you sign on to with that user
account. Note that even if you use roaming profiles,
you may want to back up your encryption certificate
and private key. However, if you do lose the keys that
enable you to decrypt a file, you can request the
designated recovery agent (by default the local
or domain administrator) to recover your encrypted
files.
- Manually moving keys. Before you
contemplate moving your keys manually, you should back
up your encryption certificate and private key. You
can then restore your certificate and key on a
different system.
To back up your encryption certificate and private
key
- To start the Microsoft Management Console (MMC),
click Start, click Run, type mmc
in the Open box, and click OK.
- On the Console menu, click Add/Remove
snap-ins, and click Add.
- Locate the Certificates snap-in, and click
Add. Select My user account and then
click Finish. Click Close. Click
OK.
- Locate the Encrypting File System
certificates in your Personal certificate store. Click
the + next to Certificates–Current User.
Expand the Personal folder. Click
Certificates.
- Right-click your certificate, click All
Tasks, and click Export. This starts the
Certificate Manager Export wizard. Click
Next.
- Click Yes, export the private key. Click
Next.
- The export format available is Personal
Information Exchange-PKCS#12, or .pfx—personal
exchange format. Click Next.
- Provide the password to protect the .pfx data.
Click Next.
- Provide the path and file name where the .pfx data
is to be stored. In this case, type c:\mykey.
Click Next.
- A list of certificates and keys to be exported is
displayed. Click Finish to confirm.
- Click OK to close the wizard, and close the
snap-in.
This exports the encryption certificate and private
key to a .pfx file that must be backed up securely.
To restore your encryption certificate and private
key on a different system
- Copy the .pfx file to a floppy disk, and take it
to the computer where you want to import the
encryption certificate and private key.
- Start the Certificates snap-in by clicking
Start, clicking Run, and then typing
mmc.
- On the Console menu, click Add/Remove
snap-ins, and click Add.
- Click Certificates, and click
Add. Select My user account and then
click Finish. Click Close. Click
OK.
- Right-click Personal store, click All
Tasks, and click Import to import the .pfx
file.
- This starts the Certificate Manager Import
wizard. Follow the wizard steps to successfully import
the certificate and private key.
- Provide the path to the .pfx file. In our example,
it is c:\mykey.pfx.
- Type the password to unwrap the .pfx data.
- Click Place all certificates in the following
store, and accept the Personal certificate store.
Click Next.
- Click Finish, and then click OK to
start the import operation. When the import is
complete, click OK to close the wizard.
Once you have the same keys available, you can
transparently use encrypted files that may have been
backed up on different computer.
Folders and Files On a Remote Server
You can transparently encrypt and decrypt files and
use encrypted files stored on a remote server. This
works whether you access those files remotely or log on
to the other computer locally. However, you must
remember that when you move encrypted files using backup
and restore mechanisms, you must ensure that the
appropriate encryption certificate and private keys are
also moved to allow you to use the encrypted files in
their new destinations. Without correct private keys,
you cannot open or decrypt the files.
Note: If you open the encrypted file over
the network, the data that is transmitted over the
network by this process is not encrypted. Other
protocols, such as Secure Sockets Layer/Personal
Communication Technology (SSL/PCT) or Internet Protocol
Security (IPSec) must be used to encrypt data over the
wire.
Administrative Scenarios
Securing the Default Recovery Key on a Stand-alone
Computer
For this set, logon as Administrator to the local
computer (in our example, this is the machine named
hq-res-srv-01), a member server. Be sure you
logon to the computer locally (as opposed to logging
onto the domain).
As part of the local administrator’s initial logon, a
default recovery policy is set up on each stand-alone
computer. This policy makes the local administrator the
default recovery agent for the computer.
To change this policy
- Click Start, click Run, and type
MMC in the Open box. Click OK.
- Click Console, click Add/Remove
Snap-In. Click Add.
- Click Group Policy and click Add.
- Accept the default of Local Computer and
click Finish. Click Close and click
OK.
- Click the + next to Local Computer
Policy to expand it. In the same way, expand
Computer Configuration, Windows
Settings, Security Settings, Public Key
Policies, and then click Encrypted Data
Recovery Agents. Your screen should look something
like the one below.
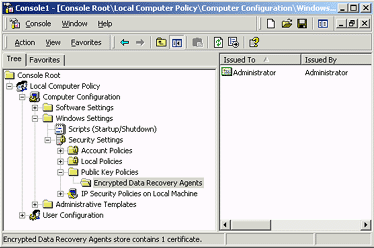
Figure 5. Encrypted data
recovery agents
- You see a self-signed Administrator certificate in
the policy. This makes the local administrator account
the default recovery agent. If you delete this
certificate, you have an empty recovery policy, which
turns EFS off. EFS doesn’t allow encryption of data if
there are no recovery agents set up.
- To protect the recovery key associated with this
certificate, click Console, and click
Add/Remove snap-ins. Click Add.
- Click Certificates, and click Add.
Click Current User. Click Finish. Click
Close. Click OK.
- Click the + next to Certificates—Current
User. In the same way, expand the Personal
folder. Click Certificates in the left pane.
- Click Administrator in the right pane and
scroll to Intended Purposes. This should be set
to File Recovery. Use the procedure in the
section, Restoring
Files to a Different Computer, to export the
certificate and private key in a .pfx file.
- After you have created the .pfx file, delete the
certificate and the private key associated with it
from the Personal store. This ensures that the only
copy of the key is in the .pfx file. To do so, click
Administrator in the right pane and then click
the red X on the toolbar. You will receive a
warning message saying that you will not be able to
decrypt data encrypted using this certificate. Click
Yes to continue.
- Secure the .pfx file in a safe or locked cabinet.
This file should be used only when a file needs to be
recovered.
Securing the Default Recovery Key for the
Domain
As with the stand-alone computer, a default recovery
policy is configured for the domain when the first
domain controller is set up. The default recovery policy
uses a self-signed certificate to make the domain
Administrator account the recovery agent.
Note: To change the default, log on as
Administrator on the first domain controller of the
domain, and follow the steps above to secure the
recovery key for the domain.
Requesting a File Recovery Certificate
If you decide to use the default recovery policies,
you never need to request a file recovery certificate.
However, in circumstances where multiple recovery agents
are needed for the domain or where the recovery agent
needs to be different from the domain administrator due
to legal or corporate policy, you may need to identify
certain users as recovery agents, and these users must
be issued file recovery certificates.
To accomplish this, the following procedures must be
completed:
- An Enterprise certification authority (CA) must be
set up, if one isn’t available. (See also Step-by-Step
Guide to Setting up a Certification Authority).
- The policy on the Enterprise CA must allow the
designated user/agents to request and obtain a file
recovery certificate.
- Each user must request a file recovery
certificate.
To set up an Enterprise CA
- Log on to the first domain controller in the
domain as the domain administrator. In our example,
this entails logging onto the computer
HQ-RES-DC-01 in the RESKIT.COM domain.
- Click Start, point to Settings, and
select Control Panel.
- Double-click Add/Remove Programs
- Click Add/Remove Windows Components.
- Click Certificate Services. You will
receive a warning that once Certificate Services are
installed, the computer cannot be renamed and the
computer cannot join or be removed from a domain.
Click Yes to continue. Click Next.
- Make sure the Enterprise root CA radio
button is selected and click Next.
- Fill in the properties as shown below.
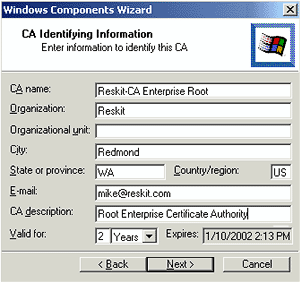
Figure 6. CA identifying
information
- Click Next. Click Next to accept the
default data storage location.
- If IIS is running, you are prompted whether to
temporarily shut that service down. Click OK.
- You may be prompted to insert the Windows 2000
Server CD-ROM; unless you are installing from a
network source insert the CD-ROM or provide the path
to the network source. Click OK to proceed.
- After the component has installed, click
Finish. Close the Add/Remove
Programs and Control Panel.
To create a policy for users designated as
recovery agents
- Click Start, point to Programs,
point to Administrative Tools, and click
Active Directory Computers and Users.
- Right click Groups, click New, click
Group, type Domain Recovery Agents and
click OK.
- To add users to that group, right-click Domain
Recovery Agents in the right pane, click
Properties, click the Members tab.
- Click Add, click Administrator, and
click Add. Click OK twice. Close the
Active Directory Computers and Users snap-in.
Add the Domain Recovery Agents group to the EFS
Recovery Template.
This procedure allows users in that group to request
recovery certificates.
- Click Start, point to Programs,
point to Administrative Tools, and click
Active Directory Sites and Services.
- On the View menu, click Show
Services.
- Click the + next to Services in the
left pane. Use this method to expand the Public Key
Services folder.
- Click Certificate Templates (in the left
pane).
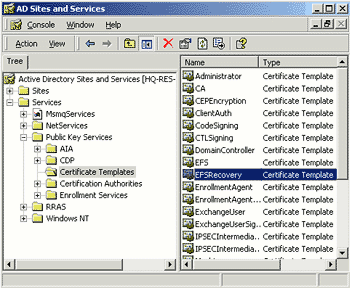
Figure 7. Certificate
templates
- Double-click EFSRecovery in the right pane.
- Click the Security tab.
- Click Add. Scroll to the group Domain
Recovery Agents. Click Domain Recovery
Agents and click the Add button. Click
OK.
- With Domain Recovery Agents selected in the
top pane, select the Enroll check box in the
bottom pane.
- Click OK, and close the Active Directory
Sites and Services snap-in.
Note: For more information on administering
Certificate Services, refer to the document,
Step-by-Step Guide to Administering Certificate
Services.
To request a file recovery certificate
- Start the Certificates snap-in by clicking
Start, clicking Run, and then typing
mmc.
- On the Console menu, select Add/Remove
snap-ins, and click Add.
- Click Certificates, and click Add.
Select My user account and then click
Finish. Click Close. Click OK.
- Click the + next to Certificates–Current
User.
- Right-click Personal in the left pane,
click All Tasks, and click Request New
Certificate. This starts the Certificate
Request wizard.
- The first page of the wizard is informational.
Click Next to continue.
- A list of certificate templates is displayed.
Click EFS Recovery Agent, and click
Next.
- Type in a friendly name that you can use to
distinguish this certificate from others. Add a
description if you desire. Click Next.
- The next page shows you the summary of your
choices. Click Finish to obtain the
certificate.
- Click Install Certificate and then
click OK.
You have now obtained a file recovery certificate. At
this point, you need to do two things:
- Copy the certificate without the private key to a
.cer file. You need to do this only if the certificate
is not automatically published in the directory, in
order to enable the domain administrator to add it to
the recovery policy.
- Export this certificate with the private key to a
secure .pfx file.
To copy the certificate to a .cer file
- Click the + next to Certificates
under Personal in the left pane (unless it is already
expanded.)
- In the right pane, right-click the certificate you
just created.
- Click All Tasks and click Export.
This starts the Certificate Export wizard as
described previously in this document. Click
Next to begin the export process.
- Click No, do not export the private key and
click Next.
- Choose the default .cer file format, and
click Next.
- Provide the file path, and click Next.
- Click Finish to perform the export, and
then click OK.
To export the certificate to a secure .pfx
file
- Follow the steps outlined in the section Restoring
Files to a Different Computer.
- Remember to delete the certificate and the private
key from your store after you have exported it to a
.pfx file. This key is highly sensitive, as it can
decrypt any encrypted file where the recovery policy
is in effect.
- Close the Certificate snap-in.
Setting Up a Recovery Policy for the Entire
Domain
Once recovery agents have been identified and issued
certificates, the domain administrator can add these
certificates to the recovery policy, as described
next.
To add certificates to recovery policy
- Click the Start button, point to
Programs, point to Administrative Tools,
and then select Domain Security Policy.
- Click the + next to Security
Settings.
- Click the + next to Public Key
Policies.
- Click Encrypted Data Recovery Agents. Now
right-click it and click Add. The Add
Recovery Agent wizard starts. Click Next.
- Click Browse Folders.
- Click the certificate that was created in the
previous steps, exportnewcertificate.cer, and
click Open.
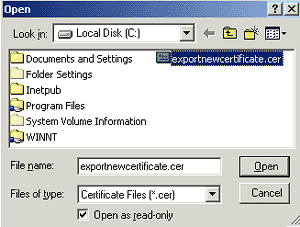
Figure 8. Select certificate
from folder
- Click Next, and then click Finish.
The new certificate now appears in the right pane of
the Domain Security Policy snap-in.
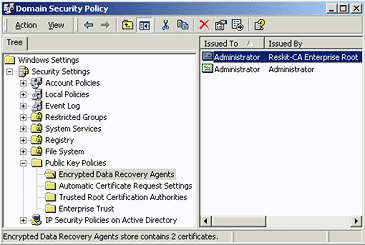
Figure 9. New
certificate
Setting a Recovery Policy for a Specific
Organizational Unit
You may be required to establish a unique recovery
policy for a subset of computers in your domain. You can
accomplish this by using the Group Policy
infrastructure. To do this, repeat the steps described
above for an organizational unit (OU) rather than a
domain node.
In the case of an OU, you do not have a default Group
Policy Object that you can simply edit. Therefore, you
need to click Add in the Group Policy
dialog box to add a new GPO.
Once you have added the new GPO, use Edit to
start the Group Policy snap-in and then follow
the same steps as above to define a different recovery
policy for that OU.
Recovering a File or Folder
Recovery agents may need to recover files or folders
if a user loses his or her key or leaves the company, or
if there is a legal requirement to do so. The process of
recovery is similar to decryption once the recovery key
is available on the system.
To recover a file or folder
- Back up the files or folder to a .bkf file from
the system where they currently exist. For complete
procedures, see the section, Backing
Up an Encrypted Folder or File.
- Copy the .bkf file to the secured recovery agent’s
computer. To do this, you can use removable media such
as floppy disk, or you can email the .bkf file to the
recovery agent.
- The recovery agent should restored the files or
folder in the .bkf file locally on a secured system.
For complete procedures, see the section, Restoring
an Encrypted Folder or File.
- Use the Certificates snap-in to import the
recovery key and certificate from the .pfx file to the
secured system. See Restoring
an Encrypted Folder or File for the import
procedure.
- Once the recovery key is imported into the
context, you can simply open each file, or you can use
the Windows Explorer Properties dialog box to
decrypt individual files or entire folders.
- Once the decryption is complete, the recovery
agent can recreate the .bkf file, this time containing
decrypted files and folders, and mail it back to
requestor.
Disabling EFS for a Specific Set of Computers
In some cases, you may need to ensure that a
stand-alone computer or some computer in an OU (in
Active Directory) has EFS disabled. The best way to
disable EFS is to set an empty recovery policy. You can
do this locally on the computer using the local Group
Policy snap-in or by defining a GPO at the OU level with
an empty recovery policy.
Note: There is a difference between an
empty policy and no policy. In Active Directory where
the effective policy is an accumulation of Group Policy
Objects defined at various levels in the directory tree,
the absence of a recovery policy at higher-level nodes
(for example, at the domain node) allows policies at a
lower level to take effect. An empty recovery policy at
higher-level nodes disables EFS by providing no
effective recovery certificates. On a given computer
(stand-alone or joined to the domain), an effective
policy must have at least one valid recovery certificate
to enable EFS on that computer. Therefore, on a given
computer, the absence of a recovery policy or an empty
recovery policy has the same effect—EFS is
disabled. |


